LESSON FIVE - BUILDING YOUR ROAD
Now you have a layout and your approvals, it is finally time to hire a road contractor and begin building. This is best done from mid-summer to mid- fall when conditions are dry. This lesson provides an overview of how to build a road. It gives you a basic understanding so you can discuss the road plan and work underway with the contractor. It also looks briefly at stream crossings and road maintenance.
For more details, read the booklet Environmental Standards for the Construction of Forest Roads and Ponds in Nova Scotia.
(See Appendix A).
In the previous lesson on layout, the message was "Stay away from the water." Now that construction is underway, the message is "Get the water away." This is done through proper use of ditches, culverts, building materials and grading to allow good drainage of water away from the road as soon as possible. The goal is to allow water to flow along its natural course rather than be blocked by the road.
The contractor's equipment should be in good working order and not leaking oil, hydraulic fluid or fuel into the soil or waterways. Adding fluids or refueling should be done at least 30m from a watercourse. The contractor should be knowledgeable about ways to reduce erosion while the road is under construction and have on hand a spill control kit to absorb fluids in case of an accident. The spill kit should include a selection of absorbant materials to contain an oil or chemical spill.
In the event you need additional help cleaning up a spill, you can call the NS Department of Environment and Labour at 1-800-565-1633 which deals with spills and other environmental emergencies. You may also want to become familiar with the Emergency Spill Regulations under the Provincial Environment Act that may apply should a spill occur.
STEPS IN ROAD BUILDING
A road is built in small sections beginning with cutting the trees, grubbing or removal of debris, ditching, installing culverts, building the base and crown, and grading. It is best to preplace any needed culverts and bridges along the route so they can be installed as the road is built. Ideally, culverts should go in as soon as possible to handle runoff immediately and protect the watercourses.
As each section is more or less complete, the machines can move on to the next section and begin grubbing. The grubbing distance should be no more than 200 m (656 ft) ahead of the finished road behind it. If you must build in wet areas, it involves some special techniques that are reviewed last.
Cutting the trees
The first step is to harvest the trees along your route. This corridor is called the right-of way. For a "D" class harvesting road, the recommended width of 12 m (39 ft) is three times wider than the road itself (4 m or 13 ft) to leave room for ditches and back slopes. This width also allows the sun in to dry the road and permit good visibility on turns.
 |
Cross section of a road |
Aesthetics or how the road looks is also an important consideration for some landowners. They may prefer a scenic road with large trees close to the road edge and hanging branches overhead. A narrower right-of-way may be enough on roads that will only be used during dry and frozen conditions. Also a road used only for recreation or access may not need so wide a right-of-way.
If fewer trees are cut and fewer stumps removed, there is less potential for erosion. Also, less habitat will be lost. However, keep in mind that trees left close to the road will have more roots damaged during construction and may be prone to wind throw.
Grubbing
Grubbing refers to the removal of stumps, organic soil, rocks and slash along the route. This is done with a bulldozer and/or excavators. Excavators, (large back hoes) are more effective in wet areas.
Sometimes the stumps are piled up along the edge of the right-of-way. This looks unsightly and can block entrance into the woods by machines and cutting crews. Sometimes the stumps and rocks are used to fill in dips and holes in the road. This may be quicker and cheaper but does not create a good quality road as they settle and rot.
A preferred method for grubbing is to dig a hole off to the side of the road ahead of the excavator. On a slope, use the downhill side. Put the soil removed from the hole behind the excavator to build up the road. Then put the stumps and rocks in the hole, cover with top soil from the road ahead and compact it. Build it up high to allow for settling and later operations. This method creates a more stable and attractive road.
While you have the excavator on site, it may be cost effective to have the operator do other work such as digging ponds, or digging test pits for good building material along the way.
Ditching
Ditches help to divert water from the road and dry it out. They may be required on both sides of the road, one side of the road on hill sides, or not at all (in areas that are well-drained all year). The side of the ditch away from the road is called the back slope. The side next to the road is called the embankment and it should have a slope not more than 2:1 to hold the road in place.
Material from the ditches can be used to build up the road if it is suitable. The depth of the ditch depends on the height of the road but should be at least 45 cm (1.5 ft).
Water should not flow along a ditch for a long distance or it will cause erosion. It should be directed away where needed by take-off ditches and cross culverts. Take-off ditches deposit the water in an area where the silt can settle out without damaging the environment. They should not be located near any watercourses. Digging a small settling pond or placing a straw bale at the end of the take-off ditch will also help to collect the siltation.
Installing culverts
Cross culverts may be needed under a road to direct water flow from the high side to the lower side. They may also be used where side roads and trails join the main road.
There are specifications for culvert diameter, length, material and installation that your road contractor should know. Most culverts are 18' (5.5 m) long but may need to be longer if placed at an angle under the road (See Illustration 19). Sixteen inch (40 cm) diameter culverts are a better minimum size than 12 inch (30 cm) culverts which can ice up more easily.
The depth and type of fill covering the culvert need to be considered. Use good quality fill that will not wash away and avoid large sharp rocks that might puncture the culvert. In general, cover the culvert with one foot of fill for every foot of culvert diameter. It is very important to properly compact the soil used for backfilling around culverts. Use of culverts in streams is discussed under Stream Crossings.
 |
Cut and fill on a slope |
Cutting and filling
Levelling off the road route will require some in-filling and some levelling off. On a slope, this can be done by digging out material on the uphill side and placing it on the downhill side to form the road. This is called a cut and fill. Cut and fills should be completed in layers of about 30 cm (1 ft) thick with the excavator or dozer running over each layer. This helps in soil compaction and will produce more stable fill slopes.
A long, continuous grade should be avoided. It lets water build up as it flows downhill and can cause erosion along your road surface. A small groove called a waterbar may be dug on the road surface to divert water out of a rut and into the ditch. A road grade of 3-5% is best and should not exceed 12%.
Building the base and grading
The base of your road (or infrastructure) is built from available material and should be higher than the ground next to it to provide good drainage. Using good quality material and compacting the road are both important to a successfully built road.. Compacting the road is done with heavy equipment. It helps prevent frost heave and road softening. It is best to compact the road before winter, let it settle and add the final surface of natural gravel (or foundation) in the spring after break up. If the gravel is added before winter, you may need to do it again in spring adding to your cost.
The crown is the slight upward slope from each side of the road to the middle. It is important to crown the road surface especially on long grades so the runoff is diverted into the ditches. The recommended crown is 10 cm (4 inches) in a "D" class road.
Grading is the final levelling off to create a smooth road surface. It is done using a grader or dozer. Be sure to leave the crown.
Building in wet areas
If building in a wet area is unavoidable, select a narrow location to cross it. Unlike the rest of the road, this work should be done in winter in frozen conditions. In shallow swamps (1 m or less), remove the organic mud and replace with suitable fill. In deeper swamps, do not remove stumps after cutting trees. Between the root mat and the roadbed fill, place brush, logs or geotextile fabric to stabilize the road.
It is vital to ensure that water can flow between the two sides of the road keeping the levels and exchange as natural as possible. This is done by using a sufficient number of culverts. Place these in areas where the mud is less deep to lessen siltation, and to prevent the culvert from sinking into the wetland.
STREAM CROSSINGS
If your road must cross a stream, you have three options: 1) a round or 2) arch culvert , or 3) a bridge. What you use depends on the width and location of the stream. Some basic information is provided here. For more detail, see Woodlot Roads Stream Crossings by Glen Brathwaite, available from the DNR library. This excellent 34-page guide contains technical information on such things as culvert size selection and many helpful illustrations.
Temporary fording while building
On-going travel directly through a stream can cause serious and permanent damage. However, a few crossings through the stream may be unavoidable when clearing and grubbing your road.
Try to cross where the stream bed is stable. If not possible, lay down logs or brush or some non-toxic material to protect the bed and remove afterward. Leave wood to be picked up after the bridge is built. The contractor should have on hand a temporary bridge so fording is unnecessary.
Culverts
Most culverts are round pipes usually made of corrugated metal and sometimes wood or plastic. Plastic culverts are recommended in areas where the rock produces acid. Box culverts are three-sided and made of wood. They come in a variety of widths and lengths.
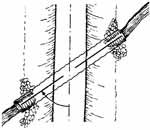 |
Skewed culvert under road |
Picking the right size depends on many factors such as the watershed, the size and slope of the stream, composition of the stream bed and fish travel. Culverts may need to be placed at an skewed angle to best align with the natural flow of water. The proper slope for the culvert depends on the overall length.
In general, pipe culverts can be used on small streams. However, water speed is increased in a culvert and fish may find it hard to travel up them. Box culverts, arches or even bridges may be needed to maintain a natural stream bed for plant and fish health. Flat rocks laid in the stream bed at the exit, known as an apron, may help reduce erosion.
As mentioned before, it is very important to use good quality fill and compact the soil around the culvert. In some places, two or more culverts may be needed.
 |
Bridge parts |
Bridges
A bridge may be needed over larger streams or where heavy use is planned. A bridge consists of the abutments, stringers and a deck. During initial construction of abutments, it may be necessary to prevent erosion by diverting the water in the stream. This is done using temporary dams called coffer dams and diversion channels. It may also be necessary to use this technique for culvert placement if too much water is present.
Approvals from DEL will be needed for this kind of work. Be sure to leave a no-grub zone with take-off ditches extending 30 m (100 ft) from the stream banks.
Temporary bridges or crossings may be needed for extraction trails across smaller streams. This may be as simple as logs chained together and laid on a brush mat. Another option is to put a log on the bank on either side of the stream to act as abuttments. More logs or planks are then laid between the logs and attached. This structure can be taken apart when harvesting is complete or you may choose to leave it for recreation or access. Some operators use larger, portable metal crossings.
MAINTAINING YOUR ROAD
Once your road is built, you will need to maintain it to keep it useable, and protect your investment and the environment. This involves keeping the road surface smooth and crowned, and ditches clear of larger vegetation.
If a road is no longer needed or wanted, you can take out culverts and rebuild natural watercourses.
 |
Design your ditches wide enough for a bush mower. |
Mowing
The ditch slopes may need to be mowed with a bush mower every five years or so. If possible, design your ditches wide enough for a bush mower, and try to keep ditches free of rocks and stumps to make mowing easier and safer. If not, they may need to be cleared manually with a clearing or chain saw. Regular use of the road should keep the road surface clear.
Seeding
Vegetation like grasses or vines should be encouraged along ditch slopes and bottom to stabilize the soil and prevent erosion. If natural cover does not occur, you may need to have the slopes artificially seeded or use brush mats or hay bales. Slopes created by cutting and filling should be stabilized quickly.
Occasional regrading by a grader or dozer may also be necessary if the road becomes too uneven through erosion or you can fill the potholes. A new layer of gravel may also be helpful but is expensive on a long road.
Removing debris
Remove any blowdown or debris that may have fallen on the road during a storm or from old age. It is also necessary to check your culverts from time to time to remove debris that may be built up at the entrance, inside or at the exit.
Going public
An option, if you plan on regular, heavy use of the road and want to be spared the maintenance, is to go public. This means turning over a section of road to the province who will then grade, plow and maintain it for you. First you need to apply to the Department of Transportation and Public Works. It is not guaranteed that your application will be accepted or only part of the road may be accepted. You will need to upgrade the road to certain DOTPW standards before handing it over. See address in Appendix B.
Lesson 5 Quiz