LESSON TWO - SAFETY PRACTICES AND HAZARDS
TRANSPORTING THE SAW
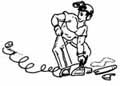
Whenever you transport the saw, it should be fitted with a chain guard to protect yourself and to prevent damage to the chain. Walk with the bar pointing behind you so you'll be protected from both cutters and the hot muffler if you slip or fall.
Apply the chain brake when carrying the saw. This is an added precaution even though the chain should not normally rotate while the saw idling. Note: Allow the chain rotation stopped to decrease before applying the chain brake to reduce unnecessary brake wear.
FUELING
Check the manufacturer's manual that comes with your saw to make sure that you are using the proper oil/fuel mixture. To avoid spilling gas on the hot engine a funnel with a strainer can be used to fill the tank. Never refuel with the engine running. Start your saw at least 3m (10 ft.) from the refuelling spot.
Always fill the oil tank at the same time as the fuel tank. Having the oil tank run dry will severely damage the chain and bar. Heavy weight (or summer oil) should be used at temperatures above 5 Celsius (40 F), light weight (or winter oil) at lower temperatures. In all cases, follow the manufacturer's manual. NEVER smoke while refuelling the saw. Have a fire extinguisher nearby and avoid spilling oil or fuel while refilling.
CHECKING THE SAW
Get in the habit of checking your saw before you begin to work. As discussed in the previous lesson, check the following items:
- Throttle control lock-out
- Chain brake
- Chain catcher
- Anti-vibration system
- Rear hand guard
- Chain tension
- Depth gauge settings
- Nuts and bolts for tightness
When checking the chain tension, ensure that the chain is snug on the bar but loose enough to be pulled around the bar by hand.
NEVER tighten the chain while the saw is idling.
It is best to tighten the chain when it has cooled down. Adjusting a hot chain will cause a very tight fit when the chain cools down and contracts.
Breaking in a New Chain
Most new chains are coated with a rust inhibitor but this is not a lubricating oil. Therefore, a new chain should be soaked in lubricating oil (preferably overnight).
Break in the new chain following this procedure:
- Place the chain on the guide bar and tighten snugly while still allowing the chain to be turned freely by hand.
- Start the saw and run the chain for a couple of minutes without cutting wood to allow the parts to loosen.
- Allow the saw to cool down and then adjust the tension.
- Make a few cuts in a log to try the chain, then allow it to cool down before read justing the tension.
STARTING PROCEDURES
 Starting a chainsaw may appear fairly routine but there's more to it than just pulling the starter cord. Accidents can occur, especially when the chain starts racing around the bar once the engine is running. Before attempting to start your saw ensure that:
- an operating check is made of all safety features.
- the bar and chain are in place. Starting a saw without them can result in the clutch mechanism flying off and causing injury.
- the saw is well away from any objects that may catch in the chain.
 Cold Start
The safest and most common method is starting the saw while it is firmly on the ground. Ensure the ignition switch and choke are both "ON" and the throttle control latch is engaged. Steady the saw by placing your right foot through the rear handle. Grip the front handle with your left hand and the starter cord with your right hand.
Pull gently until you feel some resistance from the starter mechanism. Then, use a quick sharp pull to start the engine. Keep hold of the handle as the cord retracts. Rev the engine briefly to release the throttle control latch and let the saw idle.
Warm Start
If the engine is warm, the saw must be started by one of two alternative methods. Neither the choke nor throttle control latch need to be used.
Method 1
Starting on secure footing with your feet slightly apart. Hold the front handle with your right hand so the starter side points away from you. Starting the saw with the starter side towards you can result in serious injury.
Grasp the starter handle with your left hand. Lift the saw by bending your right arm. Lower the saw quickly while pulling the starter handle.
 Method 2
 Grip the saw's rear handle between your thighs.
Holding the front handle firmly with your left hand, pull the starter handle with your right. These two methods are particularly suitable when brush or ground conditions make it difficult to start the saw on the ground.
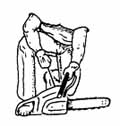
HANDLING THE SAW 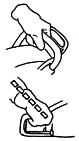
Stand with your feet planted firmly on the ground and legs spread about shoulder width apart to give you a balanced stance. Boots with non-slip soles should be worn to prevent slipping and injury.
Grip the saw with your thumb around the front handle not over it. A loosely-held saw can be easily jerked out of your hand during kickback.
Keep your wrists straight to reduce strain and muscle fatigue. Rotate your right hand whenever you have to change the cutting position of the saw. Use your thumb to control the throttle when the saw is on its side. This may seem difficult at first, but it becomes easier with practice.
Hold the saw firmly and close to your body. Keep your arms bent. Outstretched arms will tire you more quickly and keep you off balance. To control the saw better and relieve the load on your back and arms, use your body and the tree stem to support the saw while cutting. (Remember, your hands and arms are used mainly for guiding the saw and not bearing its weight). This is sometimes the most difficult part to learn. However, resting the saw body against the stem or your body makes common sense and is one of the most positive comments about modern cutting practices.
Never saw above your head! In this position you cannot adequately control your saw. A good rule of thumb is to never raise the tip of the bar above your head.
When cutting always maintain a firm, balanced stance and ensure the saw is running at full throttle. This will prevent you from being jerked off balance.
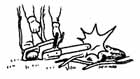
Kick-back:
The dangerously sudden and uncontrollable movement of the saw guide bar during kick-back is a common cause of chainsaw injuries. It occurs when the nose of the bar comes in contact with the tree or any solid object. The chain jams and pile sup at the point of contact forcing the saw guide bar violently back and up towards you. Kick-back can cause serious injuries.
- Pay attention to what you are doing
- NEVER cut with the kick-back zone
- Use a safety chain
- NEVER file the depth gauges too low (use depth gauge tool)
- Maintain a strong grip on the saw at all times (both hands)
Muscle and Joint Strain
Using a chainsaw involves a lot of physical work that puts a heavy strain on your back and joints. Always use safe lifting methods to avoid injuring yourself. Keep your back straight, lift with your legs. Always grip the object securely and don't twist your back. Fifty-five percent (55%) of all injuries are caused by poor lifting and carrying techniques. The muscles in your legs are the strongest in your body; the muscles in your lower back are the weakest.
Fatigue
Fatigue is one of the most common reasons for injuries. You must always be alert when operating a chainsaw. The majority of injuries occur in the mid to late afternoon when you and your muscles are becoming tired after working all day.
Take the time now to learn how to use the chainsaw safely. With the seriousness of saw injuries, a few moments learning safe practices can save a lifetime of regret.
*****************