LESSON FOUR - DEVELOPING RECREATION OPPORTUNITIES
This lesson provides some basic information on trails, bridges and various structures to improve recreation on your woodlot and make it safer and more enjoyable. This information may also affect your recreational goals and objectives by giving you some new ideas. Or you may change an objective when you realize what is involved in upgrading a trail for example. Sources of additional information are suggested throughout the lesson and are listed in the reference section (Appendix B).
The information for Lesson Four was taken in part from two manuals on trail development and modified for small private woodlots. The first manual is Notes from the Trail Development Workshop, Gaelic College, October 1994. It covers trail planning, trail construction and guidelines for specific activities.
The second manual is Introduction to Basic Trail Development, prepared by the Parks and Recreation Division of Natural Resources, June 1995. It has more detailed information and diagrams on trails, steps, bridges, crossing wet areas, view points and signs. Both are available from the Parks and Recreation Division, Nova Scotia Department of Natural Resources, RR #1, Belmont, NS BOM 1C0. Phone (902) 662-3030.
USING SILVICULTURE TO ENHANCE RECREATION.
In mature forests
In general, mature forests are attractive and suited to recreation although they are not always the best places for wildlife viewing. Trees may be large and well spaced and the canopy reduces undergrowth making walking easier. An exception to this is mature white or pasture spruce that often develop on old fields in Nova Scotia. The branchy, closely spaced trees can make travel almost impossible.
In over mature forests, decay may be a safety concern as trees die and fall over.
To create or maintain a mature forest, do not open up the canopy. Opening the canopy will permit new growth. Some people prefer to remove the undergrowth and regeneration for a manicured park look. This is not recommended since regeneration must be left to replace the mature trees as they die. Debris nourishes the soil and provides animal habitat.
In dense and less open stands
You may need to cut new trails for hiking, skiing and other forms of outdoor travel in dense woods or go around them. This can be done by cutting edge trees for wider trails or limbing (cutting branches) for narrower trails. Cut close to the stem to prevent rot when limbing. More information on limbing is provided under Trails.
Creating openings
You may want to do small patch cuts to create camping areas. You will need to clear the slash and limit new growth to maintain the clearing. Openings also provide food for wildlife and good viewing opportunities.
Silvicultural techniques such as cutting, thinning or planting can be used for recreational purpose to create views, privacy, shelter, or redirect paths. If recreation is your silvicultural priority in these areas, be careful to consider the effect on other values like wildlife and biodiversity.
TRAIL
Trails are a key element in your woodlot's outdoor recreation potential. This section looks briefly at planning, construction techniques, and trail requirements for specific activities.
Trail planning
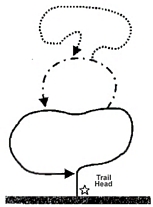 |
Illustration #14: Stacked loop |
|
 |
Compound loop |
|
 |
Radial loop |
|
Try to:
- Include diverse and attractive features such as viewpoints or wildflowers
- Link sites of special interest
- Make loops where possible
- Consider the skill level and stamina of the primary users.
Try to avoid:
- Areas that are sensitive ecologically (easily damaged or have rare species)
- Areas with poor drainage (see crossing seasonal wet areas later in this lesson)
- Hazardous areas such as old mine shafts where dangers might be unseen
- Excessive slopes
Use existing trails or make new ones
Woodlot owners will likely find it easier to use existing trails with some upgrading for their recreational purposes. It may be necessary in some situations to make new ones or develop a combination of both. Your decision depends on what the trail will be used for and the condition of existing trails.
Trail designs
Linear trails can be used to reach more distant points on your woodlot. The traveler returns by the same route unless connecting with another trail. They may be entered at multiple access points or from other trails. A long ridge or shoreline may be suited to a linear trail.
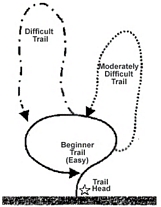
Loops are preferred when users must return to the same starting point. It reduces impact on the trail and provides more interest. Loops are more suited to short day use trips. Short spurs may be cut to points of interest. In addition to a simple loop, there is a stacked loop and a compound loop.
A radial layout is similar to a wheel with spokes going to a central hub. This layout is suitable where a central facility exists in a small site.
A maze allows a variety of potential routes. It is easy to create in a woodlot with lots of logging roads.
TRAIL CONTRUCTION
Cruising for new trails
Potential new routes should be cruised in the spring when it is easier to detect any wet areas, Flag a corridor that your trail will lie within or the trail itself if it is clear to you. Do this by tying flagging tape to the branches or trunks.
Trail height and width
A rule of thumb for hiking trail clearance is the height of your arms extended above your head (about 2.75m or 9.02 feet) and the width of your arms outstretched (about 2m or 6.56 feet). This rule is useful when upgrading old trails as well as when creating new ones. The width will need to be doubled if you require two-way travel. For limited use, it may be more practical to move to the side to allow passing. Special requirements for other activities are discussed later.
 |
Illustration #17: Trail height and width |
Cutting can be done with hand tools such as axes, brush hooks and chain saws.
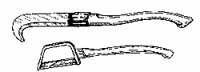 |
Illustration #18 : Brush hook and brush axe. |
Cut branches and trees within the clearance area. Cut branches as close to the trunk as possible but avoid scarring the trunk. This allows the wound to heal over faster. Limbing spruce and fir may promote rot so avoid limbing these species if possible. Cut stumps as low as possible. Pile slash to the trail edge to provide shelter for small animals or scatter it in the woods allowing it to decompose faster. You can also limb up cut logs and place them along the trail for sitting.
The trail surface
The type of trail surface depends on what activities will take place. Some activities require a smoother surface than others like mountain biking. Many woodlot owners may not have the time or resources to gravel or fill in trails extensively as in a park or community trail network. However, if you have access to a chipper or a gravel pit this may be an affordable option for you.
In dense woods, it may be necessary to cut small trees to create a trail. Remove stumps when constructing the trail or later when they have rotted. Also remove small boulders and other obstacles if possible and fill in the holes. Drainage is important. Dig out channels if necessary to direct surface runoff away from trails to prevent erosion. Brooks and streams across your trail require culverts.
Crossing seasonal wet areas
Try to avoid seasonal wet areas when planning your trail. Unblock drainage channels if that's the problem. It may be necessary to build a simple crossing to avoid trampling vegetation along the edge. Stepping stones may be sufficient. Softwood branches laid in a crisscross pattern may be suitable where the soil is not too mucky.
Another option is a puncheon walk or logs on sills. Two logs 10 cm (3.9 inch) diameter or bigger are secured underneath by short cross pieces. The top of the logs are flattened as shown in the illustration below and then laid over the wet area.
For short distances, a corduroy trail may be useful. Logs (10 cm or 3.9 inch minimum diameter) are laid across the width of the trail with breaks for water flow.
In areas that are wet year round, more elaborate structures using logs and lumber may be necessary such as logs on stringers, decked stringers or walkways on posts. These are costly and time consuming. They are described in the two manuals mentioned at the start of this lesson.
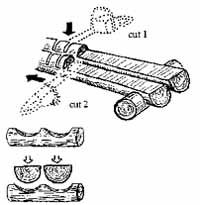 |
Illustration #19: A puncheon bridge. |
Maintenance
Cruise trails once a year with your chain saw, brush hook or buck saw (and preferably some strong friends) to remove blowdown and trim back branches. Use stumps or make benches from logs to sit on. Some areas may require more frequent clearing such as alder patches. Check the trail surface for erosion and redirect the water flow if necessary. If the trail is becoming too worn, it may need to be closed for a while or sections of the trail rerouted. Repair structures to keep them safe.
Other structures
Some trail construction, while initially involving a great deal of work, may prove useful in the long run. The following structures are helpful in areas of excessive slope. Switchbacks make travel on steep slopes easier. Stairs help in short, steep climbs. Trails built across steep slopes can be supported using retaining walls or side-filled using various techniques. These structures are described in the two manuals mentioned earlier.
TRAIL REQUIREMENTS
Most trails on your woodlot can be used for a variety of recreational activities. Some activities however have special requirements so you may need to study your woodlot to determine the best trail to use for these activities and what changes may be required.
Winter activities
Winter trail activities require extra height clearance. Not only is the user higher up but branches droop under the weight of the snow.
Faster activities
Certain activities involving speed (skiing, biking, snowmobiling, ATV's, etc.) also have special requirements. Turns anywhere on a hill should not be too sharp. A wider bend gives people more room for turning and allows them to see others sooner and move aside if necessary. Switchbacks used for hiking may be too tight for activities with more speed.
Incompatible activities
Some activities cannot be done comfortably on the same trail as others if there is high use. For example, hiking and motor biking, or skiing and snowmobiling. The reasons include noise level, danger to users, and damage to the trail. On a woodlot however, it may be more difficult to limit a trail to specific uses. Signs prohibiting motorized activities or advising caution may help.
Trail requirements for five common activities - hiking, skiing, snowmobiling, mountain biking and horse riding - are outlined below.
Hiking
Most trails can be used for hiking. Some people may enjoy low, narrow animal trails with less than the recommended clearance. In general, day hiking trails should be 2 metres (6.56 feet) wide for single track and 3 metres (9.84 feet) wide for double track. Longer hiking trails may be narrower. Height clearance should be about 2.75 metres (9.02 feet). The Nova Scotia Trails Federation has more information on trail development for hiking. Contact Sport Nova Scotia, PO Box 3010 South, Halifax, NS B3J 3G6 (902) 425-5450, Extension 325. If you are planning on using the same trails for skiing, follow the requirements below.
Skiing
Trails designed for skiing should be two metres (6.56 feet) wide for single track and 3 metres (9.84 feet) wide for double track. Four metres (13.12 feet) height will allow for snow. A minimum of 4 metres width will be needed if you want to ski skate. Avoid trails with sudden turns on hills. Bends on steep hills should be wider (3 metres or more) for downhill turning and for uphill herringbone or side ways step. A widened turn out at the hill base is recommended.
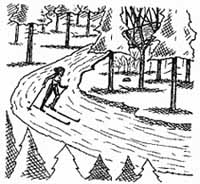 |
Illustration #20: Bends on hills should be 3 metres (9.84 feet) or more for skiing. |
Cruise potential routes to assess where snow accumulates and where it melts fast; also check for wetness, obstacles, and sudden dips. Dips can be filled in with brush before the snow falls. Be careful of brush-filled dips when using trails for non-winter activities.
Avoid routes that will get skis wet as this can cause snow to stick to skis and ruin a trip. On shallow streams, ski over ice if possible. Placing stepping stones in the off-season in the stream may be useful. If the stream is too deep, consider building a bridge or rerouting.
Grooming can be done if you have a powerful enough snowmobile and a groomer to compact and smooth the trails but most woodlot owners likely will break their own track. Once a track is established, it can be used by other skiers until the next big snowfall. You may want to post signs asking snowmobilers and snowshoers to avoid ski tracks if possible.
While skiing and snowmobiling are listed as incompatible in some guides, in reality they often take place on the same trails. Snowmobile tracks can benefit the skier in deep snow. If the tracks ice up however, skiing on them can be hazardous and it is better to break new trail.
Snowmobiling
Trails should be about 3 metres (9.84 feet) wide for single track and four for double with four metres height. Care should be taken when skiers and snowmobilers are using the same trails. You may consider putting up a sign indicating skiers on trail.
Since snowmobile touring requires lengthy trails, you may want to consider connecting your woodlot with the SANS network of trails. SANS has 2,500 km (1562.5 miles) of trails in the province mostly on private land and 23 local clubs. The woodlot owner can sign a permission form that gives SANS a right-of way. SANS operates and maintains the trail and assumes liability. They also provide a variety of signs including stop ahead, yield, sharp corner, bridge, tree plantations, speed limits and trail numbers. Marking gates properly is especially important for snowmobilers (see Gates).
A manual on trail development for snowmobiles is available from the SANS administrator, Sport Nova Scotia, PO Box 3010 South, Halifax, NS B3J 3G6 (902)425-5450, Extension 324. SANS is also developing etiquette guidelines for snowmobilers and other trail users.
Mountain biking
Trails should be 2-3 metres (6.56-9.84 feet) wide and 2.75 metres (9.02 feet) high. Generally, mountain bikers like hard packed trails with no rocks or roots. For this reason, old worn trails may be better. New trails may be too soft with exposed roots and rocks. -Good drainage is important.
An example of good mountain biking trails is located at the youth hostel near Wentworth, Colchester County. More information on mountain bike trails can be obtained from Bicycle Nova Scotia, at the Sport Nova Scotia address above, Extension 316.
Horse riding
Bridle paths (for horses) should be at least 2 metres (6.56 feet) wide so horses can pass one another. Recommended height is 3 metres (9.84 feet). Extra care should be taken to cut stumps close to the ground as horses trip easily.
When planning routes, avoid slippery banks and streams as horses may lose their footing. Deer trails should also be avoided as some horses will be startled if deer leap onto the trail. Snowmobiles, ATV and dirt bikes may also startle horses. Mark trails accordingly. Hikers are usually not a problem. Hiking and horse riding may be incompatible in high use areas due to horse manure and ruts but likely not a problem in low use trails on a private woodlot.
Planning your woodlot trails
When planning your trails, ask yourself: what is the purpose of my trail? It may be for a specific activity, it may be a route to a special attraction like a look-off, or both. Are there special requirements for width, height or length?
Once you have decided on use, ask yourself.. do my existing trails meet these requirements? To answer this, you may need to examine your woodlot map and walk your woodlot. Can you upgrade existing trails for your purposes? Do you need to build new trails or connect old trails? What time and effort might be required and do you have it? Use copies of your woodlot map to draw potential routes using new and existing trails.
BRIDGES
Plan routes to limit the number of stream crossings. Where possible use existing bridges on your woodlot. Nova Scotia Department of Environment permits are required for new bridge and culvert construction.
Where streams must be crossed, stepping stones or a puncheon may be suitable for some types of activities like hiking. A puncheon is best on streams less than 3 metres (9.84 feet) wide and is not suited to streams that flood since it will float away.
 |
Bridge areas may become popular spots for recreation. |
More substantial bridges may be needed for activities like snowmobiling and for wider channels. These can be built with logs, rocks and other materials on hand or it may be necessary to use timbers and lumber. Research various designs to determine the one best suited to your situation. More details on bridge designs are given in the Introduction to Trail Development Manual. Also the Nova Scotia Department of Natural Resources has a booklet available called Woodlot Road Stream Crossings, 1992, with much useful information on stream beds, culverts, disturbance, and permits.
When deciding where to place a bridge, look for high stable banks to reduce the need for cribbing. Choose the narrowest point but do not build bridges at bends in the stream because they are prone to erosion. Also, the bridge should go straight across the stream, not at an angle.
A bridge area may become an attraction for fishing, swimming, picnicking and other activities. You may want to develop it with benches and litter cans for example, or design the area to discourage recreational use with appropriate signs and gates.
PONDS AND FISHING
Ponds support a variety of activities like swimming, boating, skating, and fishing. Ponds attract wildlife and so are good areas for wildlife viewing. Ducks Unlimited has helped a few small woodlot owners develop large ponds that attract waterfowl and a variety of small mammals. Ponds may need to be excavated and cleared of weeds and silt every few years if swimming is a primary activity.
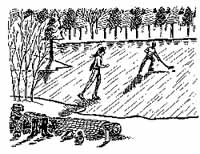 |
Illustration #22: Ponds can be used for a variety of recreational activities. |
Fishing is another popular activity. Oxygen and food supply are vital ingredients for fish to thrive. Natural ponds usually provide better fish habitat than artificial ponds. Ponds can be stocked to improve fishing. Dug ponds may not be adequate for spawning, oxygenation of the water or food production and may need to be restocked every few years. Fish may also need to be fed. For more information on stocking ponds, contact the Information Officer, Nova Scotia Department of Fisheries, PO Box 700, Pictou, NS B0K 1H0 (902) 485-5056.
Many woodlots have ponds built for fire control. Others may have natural ponds or ponds created by beavers. If you want to create a pond, look for wet areas or surface run-off. It is also possible to widen or dam a stream or create a stream bypass to a dug pond though these are not preferred methods. Heavy equipment will likely be needed. Any in-stream alteration will require a permit form the Nova Scotia Department of Environment.
The slope and width of banks are important. Also the depth must be at least 2.5 metres (8.2 feet) to prevent fish from freezing. More details on building ponds can be found in Building Woodland Ponds by Steven Talbot, 1974 and in Farm Ponds in Nova Scotia by J.K. Higgins, available from the NS Department of Agriculture and Marketing. For on-site help, contact your local Natural Resources office.
Improving fish habitat can mean better stream fishing. Fish prefer silt free streams with logs for cover and insect habitat. Don't cut trees along the stream banks because they keep the edge from eroding and branches provide cover from birds of prey. Trees also provide shade to keep the water from getting too warm. Use existing game trails further from the stream if possible.
Fact sheets on stream habitat produced by the St. Mary's River Project are available, at Natural Resources offices. As well, the Department of Fisheries and Oceans has a new brochure called Stream Restoration for Woodlot Owners.
WILDLIFE VIEWING AND HUNTING
The first step in promoting wildlife viewing on your woodlot is to improve habitat. This involves developing both shelter and food sources. This is explained with easy-to-follow directions in Module Four, Wildlife and Forestry. Feeder and nest boxes are good for attracting birds and salt or mineral licks may draw various mammals to your lot.
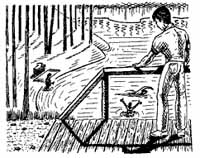
Other steps will also enhance your wildlife viewing. It is important for serious viewers to have a comfortable place to sit where it is easy for you to watch without being seen. You can use a bench or build a blind or tree stand as used in hunting.
Quiet and patience are also necessary. If you are walking, it is helpful to stop every so often and sit or pause. Walking can limit your ability to hear wildlife and may also scare them off. Rest areas along your trail may make good spots for wildlife viewing.
Being able to identify animal signs such as tracks, browse and scat can greatly add to your enjoyment. It can help you find where animals commonly feed and travel. You may not always see the popular species like deer or eagles but there are many other animals present to enjoy. Care should be taken not to disturb an animal or bird when tracking, particularly if young are involved. Young herons for example can die if disturbed in the nest.
The suggestions above for wildlife viewing will also help you with hunting. It is important to consider possible conflicts between hunters and other recreational users. For example, other users may interfere with hunting and some users feel unsafe where there are lots of hunters around.
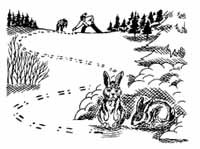 |
Illustration #23: Tracking is a challenging outdoor activity. |
For wildlife viewing or hunting you may want to buy or build tree stands. They can often be left on the woodlot for year round viewing. Wildlife often do not expect danger from above and your scent may travel over their heads.
You can buy portable stands that you can pack to a suitable location. These come with steps that either screw into the tree or are attached by straps. Prices range from $75 and up.
Ladder stands are also available at hunting supply stores. They are more difficult to transport to the desired location and take more time to put up but they are easier and more comfortable to use. Prices start at $100. Both types of stands should be used with safety straps.
Another option is to build your own. These can range from a simple ladder made with poles leading to a wooden platform to a more complex tree house with sides and roof. Tree houses offer the ultimate in comfort, safety and concealment but are expensive and time consuming to build. Since stands are spiked or screwed to the tree, some damage is unavoidable.
 |
Illustration #24: Hunting in a tree stand. |
Ground blinds also offer concealment for wildlife viewing. They can be as simple as a few branches around a natural opening or as elaborate as a wooden structure. Use materials that will blend in with the surroundings. Fresh lumber or peeled logs will blend in better as they age. Camouflaged ground blinds can also be purchased from hunting supply stores.
Both tree stands and blinds offer more viewing opportunities as wildlife get used to them after a few months. They should not be out in an opening but near or in the edge of cover.
Location and timing
Seeing wildlife also depends on being in the right location at the right time. What is "right" depends on the species you are looking for but in general edges and waterways provide good opportunities. The further you can see, the more interesting and productive your viewing will be. In thick areas, your view can be improved by cutting view lanes or narrow openings in one or more directions.
As you become more familiar with your woodlot, you will learn where to look for wildlife.
Timing is also a factor as seasons and time of day play a role in wildlife movement. For example, you are more likely to see certain species in summer or at dawn or dusk.
Excellent books are available to help you identify wildlife and learn about their habits:
- Summer Nature Notes and Winter Nature Notes, by Merritt Gibson,
- Animal Signatures, by Edward Claridge and Betty Ann Milligan,
- Notes on Nova Scotia Wildlife, by Julie Towers
- Tom Brown's Field Guide to Nature Observation and Tracking
CAMPING AND PICNIC SITES
Shelter, drainage and a level area for a tent are important if creating a new camp site. Have your site open to the east if possible to get the morning sun. Water and wood supply need to be considered. Is the water safe to drink? Will continued use of wood around this site ruin its appearance? Increasingly, campers need to consider packing in their water and fuel for cooking. Build a fireplace to prevent the development of many pits.
Waste disposal is also important. Burning garbage can be unsightly and litter can cause hazards to wildlife and people. Encourage the policy of "pack it in, pack it out". For human waste, bring along a trowel or stick and dig a shallow hole. Cover waste with a light layer of duff for best composting.
For higher use sites, you may need to build a pit privy. For more information on the health hazards of human waste and proper disposal, read How to Shit in the Woods by Kathleen Meyer.
Building camp furniture like tables and chairs out of branches, fallen logs or rocks can be fun and make the site more comfortable to use. If you are competent with a chain saw, you can get quite fancy.
High use camping and picnic spots may already exist on your property. Post signs about not littering or cutting wood. If litter is still a problem, you may want to provide litter cans and empty them regularly as a service to the community. You might also want to provide a few picnic tables and an outhouse if vandalism is not much of a threat.
CABINS
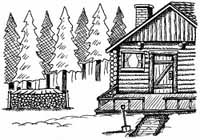 |
| Illustration #25: A wilderness cabin. |
Shelter and level ground are less important in site selection for a cabin but are still a consideration. You may want to have cover on three sides and with a view on the fourth, for example. A somewhat level area around the cabin is useful for activities like preparing wood and eating outdoors.
A water source is important. Site the cabin near a stream or spring if possible but leave a buffer. Cabins should be at least 50 m (164 feet) from lakes and major water ways. It may also be possible to dig a shallow well or collect rain water or run-off. Water may have to be boiled before drinking.
Cut fuelwood away from the cabin to maintain shelter and appearance. In most cases, it is better to get fuelwood from thinnings near the cabin or in the immediate area. Build the outhouse away from your water source and cabin. Pack out garbage or bum it thoroughly and bury the remains. This will help minimize damage to your cabin by animals.
Building with logs cut on site will be less expensive and involve less transportation of materials but will take more time. Leave enough good trees to regenerate the site. Many simple designs are possible using both vertical and horizontal logs. Backwoods Cabins by Bud Inglis is a delightful book with descriptions of 19 cabins in different parts of Nova Scotia to give you some ideas. Some are log and he provides some basic details on construction. Building with Logs by B. Allan Mackie may also be helpful.
Gates, signs and access point location can all be used to control and direct public use of your woodlot. They may be used to restrict entry for example to forest plantations, hazardous areas, and areas where heavy equipment is being used or people are working. Even with gates, users may continue to trespass (see Legal Issues in Lesson Five.)
It is important that gates be built to ensure they are visible to road users. The gate should not be hidden by a turn or bend in the road. It should be visible at all times of year. Cables and pipes should be painted a bright orange and have attached a board with diagonal orange stripes. More details are provided in the brochure Woodlot Gates in Nova Scotia: Are your gates safe? available from your local Natural Resources office.
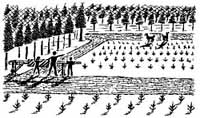 |
| Illustration #26: Signs may help control access and damage as well as improve safety. |
Signs should be posted warning of gates ahead. Other signs may be helpful but do not guarantee cooperation. A sign that explains the reason behind the request may produce better results. For example: No hunting-People at work, or Slow down-Sharp turn ahead.
Tie signs to trees rather than using nails for the safety reasons mentioned earlier. Signs can be nailed to posts or fences where possible. Posts or cairns can be used in areas without trees.
If you plan a route for skiing or hiking, for example, that will be used by people unfamiliar with it, you may want to number the trails and provide people with a map or have a large sign at the access point. Signs should be placed so people can see them from both directions. If the trail is long, you may need more signs along the route. You may also want to colour code the trails for degree of difficulty.
Access to your woodlot can be controlled by having one access road to your lot that goes by your house or with a gate you can close when necessary. Also create loop trails that return to one starting point.
SCENIC ROUTES AND SITES
Plan routes to take advantage of special attractions and scenic viewpoints. Climbing trees and taking short detours may help determine where the best views are and some thinning or cutting along the trail often help to make a view visible. Scenic qualities can also be improved by keeping edges irregular rather than straight which looks more natural. Leaving buffers between recreational areas and cuttings also improves appearance.
Scenic sites can become trampled with overuse so you may want to limit use to the trail. If the site is on a cliff or water edge, a guard rail may be required.